React is the Front End Library developed by Facebook. It is mainly used for developing the User Interfaces.
When the web-page is updated, DOM (Document Object Model) changes, the browser has to calculate the CSS, change the layout, and finally repaint the web-page again. So for every small update of the web-page, DOM should update itself regularly.
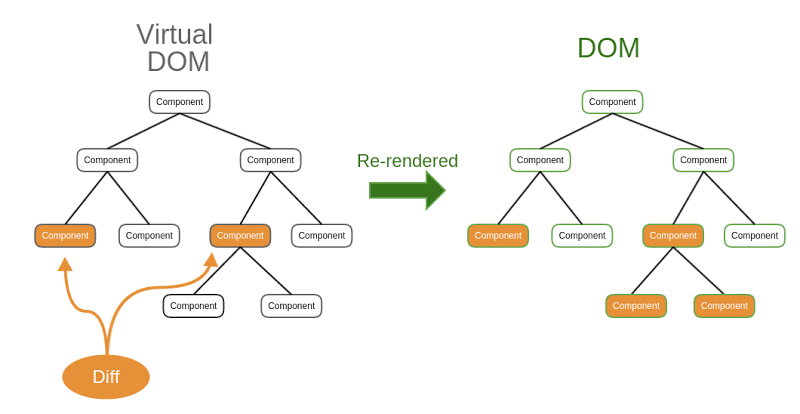
So there is a technique called “Virtual-DOM”. What Virtual DOM can do is, makes a copy of the DOM when the web-page is first loaded into the browser. When the user makes any changes to the web-page or website it compares with the original DOM and re-renders only the missing things. This reduces necessary re-draws and DOM changes.
Below is the screenshot which might help in understanding the working of the Virtual-DOM.

React uses the same technique to re-render the page automatically when needed. This eventually reduces the rendering time of the website and reduces the load time of the website.
Let’s get started with the basics of React,
Installation :
Adding React to your website doesn’t take much time. Below are the steps to install,
Add the DOM element to HTML
Add the script tags at the end of HTML which loads the react and to load the component.
After that write the script which loads the component to the website.
There is one more way of installing react. It can be done using Create-React-app. Your development environment will be set up automatically so that you can use the latest JavaScript features. It also optimizes your app for production.Make sure the version of Node >= 6 and npm >= 5.2 . To create a project, run:
npm create-react-app my-app
cd my-app
npm start</span>
Link to Create React App repository — Create-React-App
So Installation is done what is next, I’ll be explaining some of the basic concepts of React with some coding examples. Below is the list of topics which I will be explaining about,
- What is JSX?
- Components and their types
- What are the props?
- States and lifecycle
What is JSX?
JSX is called JavaScripteXtension which allows us to write Javascript that looks like HTML. It is not necessary to use JSX but it makes our life easier.
If you want to render more than one element in the screen, wrap them with div Below is a small example,
The above code is written in JSX, but when compiled to Javascript using BABEL (transpiler), the code will look like this,
Components and its types :
Every element in the application is a component. We can also reuse the components across the application which will increase the efficiency.
There are two types of components which are Class Component and Functional Component.
Functional Component :
You can use a simple javascript function to make a component and render them to the application.
Class Component :
ES6 Classes can also be used to render the components. Let’s take a look,
Detail Docs about React Component — React Component
Props :
Props are immutable and one of the ways of passing data to the component. Here is a small example of that :
You can also set the Default Props when the props are not passed to the component. Let’s have a look at an example
States and its lifecycle :
State in React is the complete opposite of props i.e it is completely mutable. Whenever the state of the component changes, React re-renders the component to the browser. A very good example of that is the timer where the state of the component keeps on changing. We will see how that works,
Explanation:
We Create a ‘Clock’ component which renders the time onto the screen. The Data is passed to the component via props. After that, we call the render method which renders the data onto the screen.
Since the time will be kept on changing passing the data via state will be a more useful one as the props can’t change. Let us make a timer bypassing the date through state instead of props.
Explanation:
Initially, the date has been sent to the component via State. The state of the component can be manipulated by using the setStatefunction.
Explanation:
So for every second, the state of the clock should be kept on changing, for that reason we place the setInterval method inside componentDidMount.
But What the heck is ComponentDidMountmethod means?
ComponentDidMount:
When the element is being rendered onto the screen for the first time in React, It is called Mounting up the component. So when the component gets mounted up initially we can make use of the method and manipulate the component when it is being initially rendered onto the screen.
ComponentWillUnmount :
When the component is removed i.e. whenever we close the browser the DOM gets removed from the screen. So at that moment, we make use of the method to clear the timer or necessary things before the Browser gets closed.
These are some of the basic concepts of React. Below I will be attaching some of the useful resources for React which can be made used to improve the skills.

What am I missing here? Let me know in the comments and I'll add it in!
Useful Resources :
Happy Learning !!!!!
