Creating a Blog with NextJS, Tailwindcss and Netlify Headless CMS - Part 1

Writing code, breaking things, then pretending it was a feature. 🤡 | Senior Software Engineer | Dreaming of Big Tech, a GDE badge, and a Koenigsegg. 🚀
In this tutorial , we will be seeing how to create a dynamic blog using Next.js, Tailwindcss and Netlify Headless CMS.
In part 1, we will be setting up our Next.js website from scratch and also getting know about the page routing system.
Let's get started,

What is Next.js
Next JS is a javascript framework which allows you to built static and server side applications. It also provides out of the box features like automatic code-splitting, page-based routing system, static exporting options, and easy production builds.
Installing Next.js
You can finish this step by either two ways
- Installing the dependencies manually and setting up the project directory.
- Using the
create-next-appto create the app skeleton.
In this tutorial , I will be using step 1. You can also check out this link to learn more about create-next-app.
Open a new terminal window (Ctrl+Alt+T on Linux or Command+Space on Mac) and execute the command below to create a new project folder (replace “your-project” with the name of your project):
mkdir your-project
Add cd into your new directory:
cd your-project
Next, run this command to create a package.json file in the root of your project:
npm init -y
The npm init -y command creates a package.json file in the root of your project directory.
The -y flag initialises the file with default values.
The package.json file will allow you to easily install and use npm package dependencies in your project.
Check out the npm documentation if you want to learn more about the contents of the package.json file.
Now that we have a package.json file created, we can install the required npm package dependencies for your Next.js website.
To get started, we’ll need the Next, React, and React-Dom npm packages.
You can install all of them at once with this command:
npm install --save next react react-dom
When those finish installing, you’ll notice that a new node_modules directory was created in your project.
Open package.json and add the following scripts:
"scripts": {
  "dev": "next dev",
  "build": "next build",
  "start": "next start"
}
These scripts refer to the different stages of developing an application:
dev- Runs[next dev](https://nextjs.org/docs/api-reference/cli#development)which starts Next.js in development modebuild- Runs[next build](https://nextjs.org/docs/api-reference/cli#build)which builds the application for production usagestart- Runs[next start](https://nextjs.org/docs/api-reference/cli#production)which starts a Next.js production server
After this your directory structure should look like this
Let's fire up the dev server and see what happens
npm run dev
You will be getting the following error
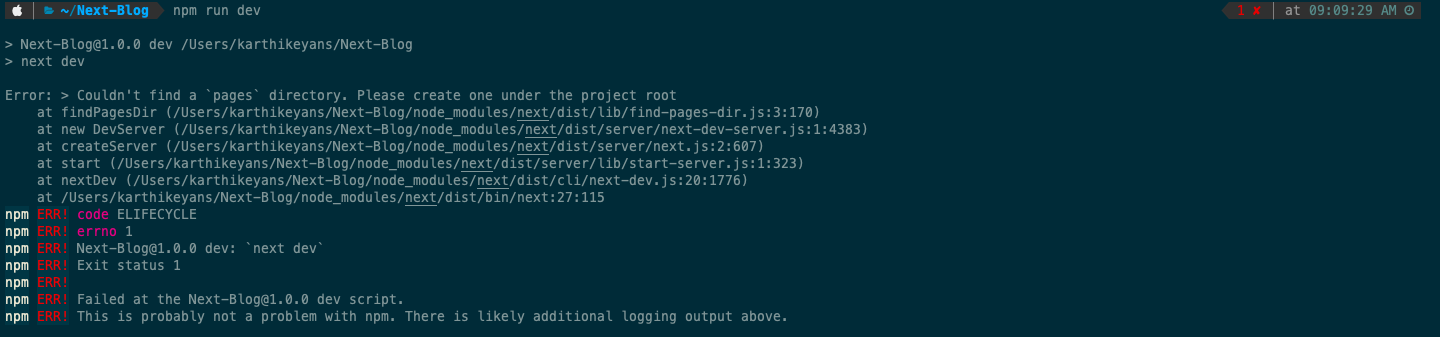
Pages:
The page is basically how Next.js interprets the routes for the application. The index.js file will be responsible for the rendering of the homepage.
For Example, if you want to route to the /blogs page, where you will have the list of the blogs rendered, then the structure will be pages/blog.js.
One more scenario will be visiting the particular blog which displays the complete blog details. This can be structured as /pages/blog/[id].js . After this, any route like /blog/1 or /blog/abc will be matched to the file.
So you might have a question like, how can we access the id of the url?. It is possible.
For example, the route /blog/acd will have the following query object
{id : 'acd'}
This is called Dynamic Routing.
Check out the Next.js docs for more info on the routing.
Now we know about the pages features, let's go ahead and create them for our app and render the index file.
// pages/index.js

import React, { Component } from 'react'

export default class extends Component {
  render () {
    return (
      <div>Blog using Next JS</div>
    )
  }
}
Now run npm run dev, which will fire up the server. Open any browser and visit the URL http://localhost:3000. You should be able to see the output in the browser window.
Congratulations, you have now created your first working Next.js website!

This concludes the first part of the tutorial. Thank you for reading. Let me know your thoughts in the comments.

Stay safe and Happy coding.


